HOME HOME ABOUT CONNECT CONTACT Image Map

Tuesday, December 18, 2012

New Winter Tags

Hey Everyone!
Are you ready for the holidays? I have been busy getting the house ready for Christmas and I can't believe it's only a week away!
I was determined to create some holiday tags and they are finally finished. I used mostly what I had in my stash and a couple of finds from Michaels. They had little packs of snowflake and deer chipboard shapes for 1.00. I believe you get 10 of each shape in the packs.
.............................................................................................................................................................

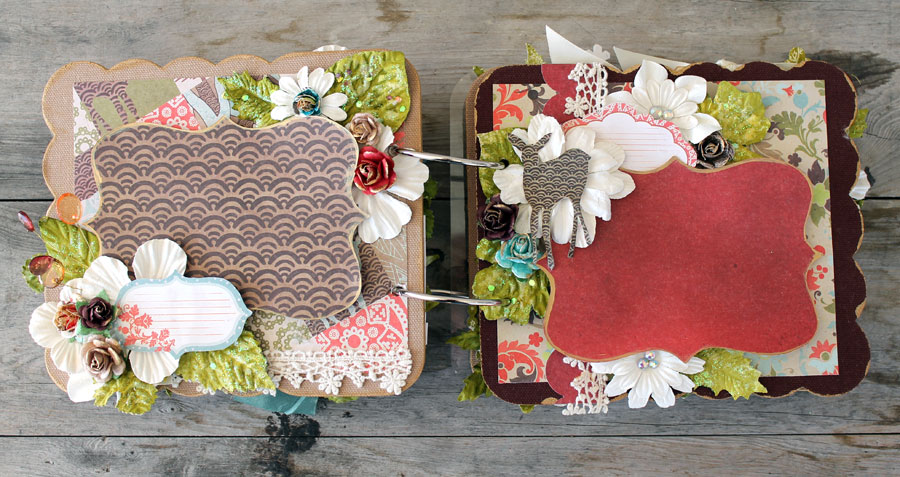
I covered the shapes in silver glitter glass and sprayed them with Perfect Pearls Heirloom Gold spray to antique the glitter. The color combo is a little different from the traditional colors of Christmas and I think it worked great. I used Songbird papers from Prima, along with crystal swirls, Poinsettias, Splendor leaves, North Country stamps and Au Naturale flowers.  


I colored the leaves with Lettuce Adirondack colorwash by Ranger. I also colored some of the seam binding with Ranger Tattered Rose Distress stain and the doilies were colored with Antique Linen Distress stain. Cover six manila tags with coordinating papers from the Songbird line. Then add strips of the papers along the bottom of the tags or make your own banners and use punches with the scraps of paper. Here I used my scallop circle punch by Marvy. I added an Au Naturale flower to the center and then topped it with a glittered snowflake and crystal center.


I covered the deer chipboard shape I found at Michaels with Wendy Addison Emporium glass glitter. I found jars of it at Tinsel Trading Company in New York. They have a wonderful color selection for all kinds of projects. Then I mixed in peachy/pink colored Poinsettias from Prima with crystal swirls and a little stamped sentiment from the North Country stamps.


I used one of my colored doilies on the background and wrapped some seam binding around the tag with a bow on the side. I added a chipboard snowflake to the center of the Au Naturale flower and finished it with a Jenni Bowlin button. I also stuck some pretty stick pins in some of the tags-love the look!


This tag also has a doilie in the background but I placed it off to the side and added my seam binding around the tag. Then I also added an Au Naturale flower with a poinsettia and snowflake to the center. I added twine to my bow with a Genie stone and smaller holly leaves tucked in around the larger ones. 


This tag is pretty straight forward. I wrapped the seam binding around the tag, punched a circle and added different sized snowflakes to the center with a poinsettia. Then finished it with leaves, pins and a little holiday sentiment.


I created banner from a scrap piece of paper and adhered it to the background. Then I wrapped a doilie around the center of the tag, added a flower with a snowflake, poinsettias, leaves and pins with a little sentiment stamped on a tag. Finish it off with some crystal swirls and it's done! 


Hope you like the tags! And I want to say-Thanks Kristina for reminding me that I needed to post these :)
Here is a list of everything I used in case you want to create some of your own...

Ranger Colorwash-Lettuce
Distress Stains-Antique Linen, Tattered Rose
Walnut Distress Ink by Ranger
Perfect Pearls Heirloom Gold Spray
Prima Poinsettias-here
Prima Splendor Leaves-White
Prima Songbird Collection-Collage, Title It, Sunrise
Prima Au Naturale Flowers
Prima Tea Thyme Swirls
North Country Cling Stamps
Prima Genie Stones
Say It In Crystal 18pc
Snowflake and Deer Chipboard Shapes-Michaels
Holly Leaves-Michaels-Recollections
Doilies-Michaels
Decorative Pins
Seam Binding-Camel Hair
Twine
Manila Tags
German Glass Glitter-Wendy Addison-Silver
Tag Punch-EK Success
Circle Scallop Punch-Marvy (pink)


Image Map

Thursday, November 15, 2012

Winter Wishes Album and Video

Hey Friends!
I had a Live with Prima class last week and I made a holiday album using all kinds of goodies with techniques, ideas, etc...I didn't have enough time to finish the album during the show, so I got to work and finished it over the weekend. I love how it turned out and I have a Christmas present finished! I hope to make a couple more before I run out of time...

Also-I am attending a couple of classes at Buffalo Stamps and Stuff this weekend with the fabulous Dyan Reavely! She is an amazing Mixed Media artist and creator of the Dylusions Art Sprays with Ranger. I am so excited to be taking classes with her. I am going with one of my besties-Sherry Czarnecki, who is truly my partner in crime and we are long overdue for some girl time. Here is the information on the classes in case you are interested in attending....go to this link and scroll all the way down: Dyan's Classes

............................................................................................

So after the show, I made some adjustments to the book and embellished some more. I cut out some deer images from the paper, used more of the canvas resist and journal spots within the clusters. It's hard not to keep going and add more! But the idea is to use what you have, gather embellies and tuck them in wherever you like to add interest to your pages.

Here are the results and I included photos from front to back....
During the show-I had originally added the deer to the right side of the cover page, but then decided I wanted to add it to the cluster. Either way-I think it would look great, so it's just a personal preference.

I also used some Zephyr alphas for the title. I plane to use the tiny type alpha once my photos are added for dates, names and maybe little phrases. I left out the photos so you can see the pages more clearly.
Then I added a little piece of scrap lace along the bottom.


This shows the back of the cover and first page. I cut out the scalloped image from the paper in the pad and added it to the paper strip with border punch. I also tucked in a couple of snowflakes from the resist canvas pack. I colored with distress stain and dabbed them with paper towel so the color is softer.


 The Tim Holtz Ornamental die will be the perfect backdrop for my photos and I used this die cut throughout the album for a consistent look. I also added a bit of the gold paint around the edges and it really made them POP!


 I added a couple of tags to my pocket page for extra journaling or small photos. Pocket pages make me happy and I love adding them throughout my books! I cut out the deer and added him to the flowers...and on the opposite page is a resist canvas deer colored with Walnut Stain Distress Ink.


This is the last page and back cover of the album, with the stamped border. I added an image from the papers and used it as a flower center...


This album will be a gift for my Mom for the holidays...I plan to do my own photo shoot of the boys and add them to the pages. Of course, they will give me a hard time as always but if it's for Grandma, then they may not be as stubborn-LOL!

This is the product list for the project:

Prima Products:
843700-North Country 8x8 Pad
843281-Forest Notes-North Country
543136-Holiday Celebration Poinsettia
537111-Build A Book Brown
541835-Acrylic Stamp-Paintable
529567-White Flower Pillar Pack
553609-Splendor White
559175-Zephyr Alphabet
551483-SIIC
552473-North Country Avon Roses
550127-North Country Alphabet
549367-Candy Gems
551605-North Country Resist Canvas

Extra Materials:
Teal Crushed Ribbon-May Arts
Gold Paint
Paint Brush
Cuttlebug
Tim Holtz Ornamental Die
Hole Punch
Trimmer
Scissors
Fabri Tac
Lace-cream or tan
Distress Stains-Peeled Paint, Fire Brick, Broken China


Here is the show and you can see the techniques and ideas I came up with to get you started on your own book! Thanks for stopping by and I will be back soon with some more holiday projects I came up with....


Video streaming by Ustream


Image Map

Wednesday, October 10, 2012

Where have I been?

Hey Friends!
Sorry it has been so long since I have blogged. Things have been a bit hectic in the Fennell household. And I have been getting ready to teach the next couple of weekends coming up too. And last week, I had a Live with Prima show featuring a tag set I had made for CHA summer. Baseball season wrapped up last weekend, with me working in the JD snack shack...thank goodness I know how to operate a grill and I sold many Skittles-LOL! And I think I am finally turning the corner with this cold. It seems to be lingering, making life a lot harder than it needed to be. Dare I say, it could have been the flu...I don't know. There seems to be a lot of sickness going around and I have paid my dues at this point.

So, I just wanted to post about my upcoming classes and let you know where, what, when and then some....
Oh and post about my LWP class last week....

Here are the tags I made on the show using Prima's Rondelle collection, flowers and more. I love making tags because they are quick, easy and fun. Sometimes it's nice to take a break from some of the bigger, more involved projects. And they can be just the thing I need to spark my creativity from time to time.


If you want to see the video on how I made these, then take a look right here:


Video streaming by Ustream .............................................................................


This weekend, I will be teaching four classes in Danbury Connecticut. It is actually on the border of New York, down state. I will be teaching at a crop for Lasting Memories. You can email or call them to reserve a spot. There are only a few seats left!
October 12th and 13th
Where: Danbury Crown Plaza, in Danbury Ct.
Contact: The email address is lastingm@optonline.net
Phone 914-403-1612.


..........................................................................................

Then i am headed to Cornwall Ontario, to teach four classes at Auntie Em's Scrapbooking and Beads. I think two of the classes are sold out, but don't quote me on that! 
October 19th-21st
Call the shop and see what spaces they have available. 
Auntie Em's Scrapbooking and Beads: call 613-938-4888 
Go here for more information!
Here are some updated pics of the projects being made:


Thanks for stopping by! I hope to be posting on here more often after the dust settles from the classes...I am taking a break from teaching after this and hopefully I will have more time to create some projects I have had on the back burner for a while now. Have a great week everyone xoxo
Image Map